I have dug out a place in the garage to start some work on the carbs and engine. I started with the carbs today. I read all the relevant documents and webpages including:
and these resources are hugely valuable and should be digested fully before you start. Let me add my own cautionary notes:
1. It's very important to get the correct size screwdriver bits to remove any of these carburettor screws and jets. I had to cut slots in 3 of my external screws with my Dremel as the impact driver bit was not working. Had I hit the driver any harder I may have damaged the carbs themselves. Some of the jets screws and the choke rail screws were already chewed up quite badly. Since we have owned this bike since new and never opened the carbs I can only assume that they are fitted like this.
2. I would recommend loosening all the float bowl, carb caps and gang plate screws before you break the carbs down into separate units. It is far easier to get a rusted/seized carb bowl screw out when you are holding the gang of four carbs than holding a single carb and trying it. Also with the gang all intact it is easier to hold the carbs and use an impact driver to loosen those bolts.
3. Have a jam jar of concoction ready and nearby. I discovered that this solution of 50% brake fluid and 50% cellulose thinners is the best solution for getting seized exhaust bolts out. It also works really well on carb jets, carb bolts and stuck choke actuation rails.
Here is the first part of my breakdown. I have recorded some photos to remind me about some of the parts so I will know how to reassemble. For instance some of the gang plate screws have washers (where they are holding other metal parts) and some don't.

The bowls have washers

The tops don't.

This one was seized to the metal part it was holding.

Some with washers and some without.

These choke activation rail screws were quite chewed up before I started.


The tube joining the carbs together have very small O rings that will need replacing.

Choke activation rod was very tight and was difficult to move. Some concoction sorted that out.
 This was my worst float bowl. Pretty grimy but I have seen worse.
 Apply some concoction to the mail jet.


 There is a washer under the main jet.
 Pushing the needle jet out (using a wood dowel - not seen).
 Top view of needle jet.
 The needle jet.
 Airscrew - spring is still down the tube.


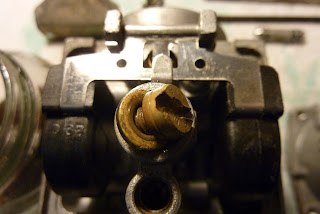
I found this main jet like this and wonder if they were factory assembled like it. As far as I know the carbs have never been apart. So why are they burred like this?


