Tuesday, 13 November 2012

Engine Removal part 2 (Day 85)

Here is a bit more of the technical explanation of how I got the engine out.  (The video of the whole affair is here:  Engine Removal Video in a previous post).

Actually saying that this is a technical explanation is really a lie.  There was nothing really technical about what we did.  Brute force, a hacksaw and plenty of help is what is needed.

Let me first show you what we were supposed to do (in reverse order of course).  All well and good if you have the engine hoist, a scissor platform jack and a car axle jack just lying around.  That's about £1,000 worth of equipment in my neck of the woods.  But I did have a laugh when I saw these photos.  This is USA vs Rest of the World analogy.  You guys (from the USA) have so much (just look at the amount of land there is surrounding this engine!) you don't even know you are alive!  We are paying $8.39 per US gallon of gas compared to the $3.15 or so that you pay.  Nearly 3 times your amount.  So look at the equipment here:


 Nice looking engine BTW.
The workshop manual is not much help (click on the photo to enlarge) saying simply:  "gradually lift up engine and lower".  Don't try this at home children.
 
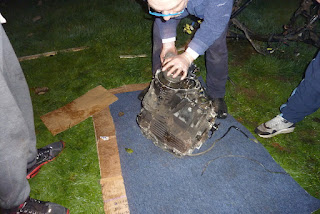
I eventually got the shaft drive off the engine (see previous post).  Then we put the rear swing arm back on so we could wheel it into the garden.  It was a tough job because both the tyres are flat and the front wheel is virtually seized.
 
We layed it down on the grass.  Then I removed the last bolts.  Then we discovered that I had not disconected the tacho cable.  I tried getting it off with a clamp wrench not realising that I needed to remove a cross headed screw first.  By now it was dark and I couldn't see it.  And if the truth was known, I had not consulted to the workshop manual about this.

 With all the bolts removed, we shook and pried at the engine.  But it would still not come out.  With 3 of us lifting the frame (complete with forks and rear swing arm) we were rapidly running out of energy.  I took off the swing arm again to make it lighter.  And finally...


Monday, 12 November 2012

Disconnecting the Shaft Drive (Day 85)

So on day 84 I was getting stuck as to how to get the shaft drive off the engine so that it would allow the engine to be removed.  See posting for Day 84.  I do have a Clymer Manual (which generously says "remove bolts securing drive shaft flange" and nothing else).  I do have a brain too and have worked on bikes many years when I was younger.  But I could not see a way to do this. (click photos to enlarge).

I decided to remove the swing arm (which contains the drive shaft) and see what that would do for me.  I had not realised that at the wheel hub end the drive shaft was simply "splined" into the drive hub of the wheel.  So the drive shaft was free but still attached to the engine.
So OK the shaft is hanging free, I can get the rubber boot off and I can easily access all the bolts.  So now lets try getting the bolts off the shaft at the engine end just north of the universal joint.  Get the spanner on nicely and try and turn it.  The shaft and the engine just goes round!  Of course.  There has been advice at this point to put the engine in gear and try that.  But with no rear wheel and the brake being removed (it was seized in any case) this was not an option either.
 
I know what to do, I will remove the silver bolts that go into the engine and see if that will get the shaft off.

These are much easier to get off because this part of the shaft assembly does not turn.  These bolts go into the engine casing and are fixed so they come out with anything spinning.  That'll do it.  Except this in not actually part of the shaft, it is the shaft housing.  Never the less it does come out.
 Here she comes.  This might work.  Or not......
No it won't.  Nearly out.  Then it hits the frame right here.
This wasn't going to work either.  So we pushed that piece back in and had another go at getting the other bolts out again (the ones connected to the universal joint that I was trying before).  The problem was; how to stop the shaft turning in order for the bolt to come undone.  I finally sussed it by getting a spanner across 2 of the nut heads, then turning the nut you want to undo with a ring spanner and when the shaft turns, the opened ended spanner being held across the 2 other nuts will hit the frame.  This provides the leverage.  We were able to get all the nuts loose and eventually off.
 On this photo above you can just see the 2 spanners at work (click photo to enlarge).  This set up did not work.  I had to lay the open ended spanner across 2 nut heads and jam it against the frame.  This provided enough leverage to crack the nuts (get the first movement) then it was reasonably easy although at no stage could you turn them with your fingers.  This is probably due to the bolt cement they use to stop them coming loose.
 The nuts are coming off.
 And we are free.
 Now back to engine removal.


Sunday, 11 November 2012

Engine Removal (Day 85)

It was a big day for us today.  We finally got the engine out.  Don't let anyone tell you that this job is going to be easy.  It was a pig.  And even after getting all the bolts and plates out it still does not fall out of the frame.  There were 3 of us on this and the frame with the wheels attached was still too heavy so I ended up taking the rear swing arm off again when it was on it's side.  Because we were in a hurry (we were losing light) I reverted to using a hacksaw to cut off the tacho cable which would not come off with a wrench.  In the end the final moment of the engine coming free was lost on video as it was too dark but we got some shots which are at the end of the video.

Saturday, 10 November 2012

Shaft Drive and Engine Removal (Day 84)

I am pretty sure that the shaft drive has to be unbolted from the engine in order to get the engine out but I can't figure out how to do this.  The bolts are under a big rubber boot that cannot be slid very far forwards or backwards (click on photos to enlarge).
 
Here's the rubber boot.
 And this is how difficult it is to get in there.
 I don't think I can disconnect the shaft from the engine with the silver bolts (which screws into the engine side) but I need to unscrew the gold coloured ones that are pointing to the rear of the bike.  How on earth do you do that?
You can see on this one that I have an allen key in the swing arm bolt.  I am thinking that that is the only way to do it by taking the rear wheel and swingarm off first.  But I want to keep the bike in rolling chassis form so I can wheel it to the place in the garden where I will put it on it's side to get the engine out.

Front Brake Lever Piston Seized (Day 84)

So having opened the front brake reservoir I now need to dismantle the front brake lever piston assembley which I know is also seized.  And I am not very sure about this glass piece in the reservoir.  It's very hazy and lined (click on image to enlarge).  Does this bit come out and can it be replaced?
 Here is the piston after the brake lever has been removed.
 This is going to be another caliper piston story.  But this time I can't use an air pump to push out the piston as there are also holes in the reservoir chamber where the air can escape so no pressure can be built up.  What to do?
 

Front Brake Reservoir Screw Problem Solved (Day 84)

I have got the drill out today.  And this little srcew is coming out.
 Much simpler than I thought being it was the first time I had ever done this.  Started with a very small drill then upped the size and having looked at the other screw guessed how far I would have to drill in to get it out.  The trick is to go in far enough to get the head off but not too far to hit the thread on the casting.

 So the lid come off nice and easy.
 Very surprised to find it full of brake fluid (which looked in OK condition being as it must be about 15 to 20 years old).  Why would the fluid not have drained when I took the banjo off? 
 Still need to get the rest of the screw out.  Luckily there was just a couple of mm of thread standing proud of the casing.
 With a hacksaw I cut a slot in the remaining screw part.
 And it came out easy peasy.  Obviously the part that was seized was the head of the screw onto the lid.  I could virtually unscrew the remainder with my fingers.
 And this is what a screw looks like that had been decapitated.

Saturday, 3 November 2012

Front Brake Caliper Piston Removal (Day 77)

Just can't believe those guys on the GS Resources Forum.  I was able, with their advice to remove this pesky piston:

To get the pistons out hook up an airline to the hole where the banjo fits. Make it a push fit using a plastic round piece that you get in the kit for pumping up an airbed etc. Place a thick rag quadrupled over on top of the piston - it'll fly off (and keep fingers out of the way). If the pistons are marked on their sides - even slightly - throw them away. Replace using stainless steel ones and the job is done forever - I think Nick Chambers has them.

This is exactly what I did.  Have to say I was pretty pessimistic that it would work.  But it popped out like a champagne cork.  I would have flown off and caused some damage to me or something in the garage had I not covered it as suggested with a rag.

What I did was to take a valve from an old bicycle inner tube.  Cut it down and screw it into the hole where the banjo fits.  Then I attached a foot pump and pumped away.  It was necessary to hold the valve in very tightly and it took 2 of us to do.  But there you are; done.  Thanks Hampshire.

 This is where we started.
 The bicycle valve.
 Inserted into the banjo hole.
 After some pumping with a foot pump she popped out.
 Can this piston and caliper be repaired / cleaned up / put back to use?

Inside the caliper is a bit rusty.

Thursday, 25 October 2012

The Stator is Revealed (Day 69)

 The famous Suzuki stator is revealed.  I am emptying the engine of oil and taking the LHS cover off is part of the job.  There is quite a magnetic force between the stator and the surrounding rotating cup.  It all looks in good repair.


And the biggest joy so far is to find that I can wrench the engine over easily.  The cylinders are not seized.